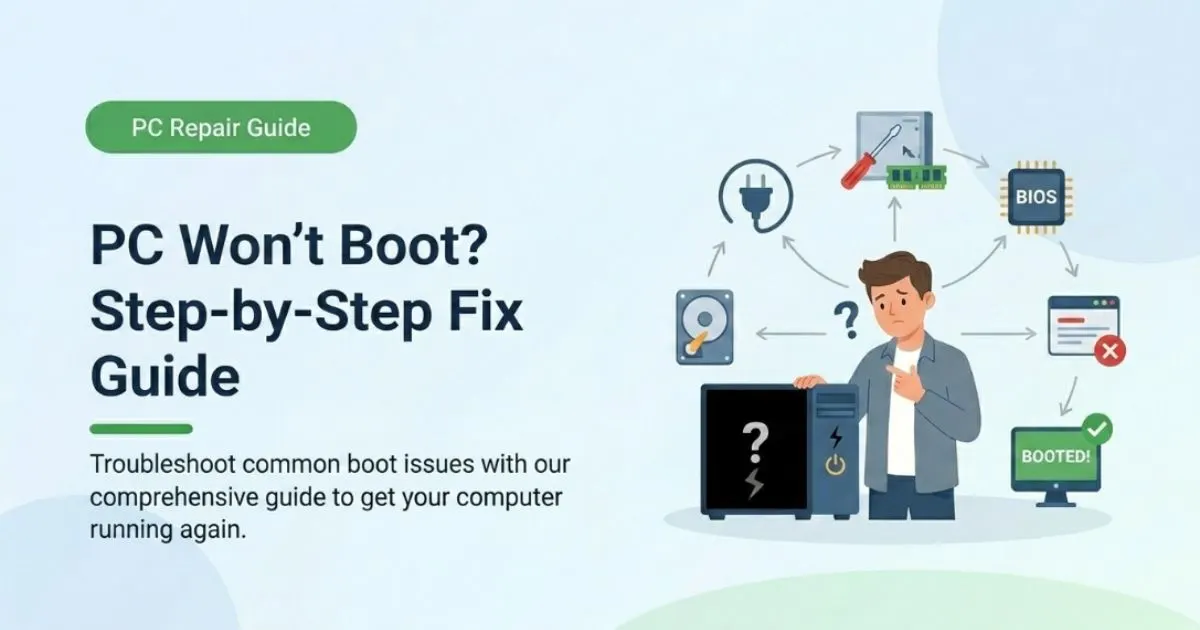
Emergency Guide: What to Do When Your PC or Laptop Refuses to Boot
You press the power button, wait for Windows to appear… and nothing happens. Maybe there’s no response at all, maybe the fans spin but the screen stays black, or maybe it keeps restarting in a loop. If your PC or laptop won’t boot, this guide is written exactly for that moment. By the end, you’ll know how to figure out what kind of boot failure you have, how to fix it safely step by step, and when it’s time to stop and protect your data.
The confusing part is that “PC won’t boot” covers very different problems: from a dead power supply to a tiny BIOS setting that changed after an update. Most guides just list generic tips without showing you how to follow a logical path, so people unplug random cables and hope for the best. Here, we’ll do the opposite: one clear decision tree, from simplest to most advanced, tailored for Windows laptops and desktops.
On this site, we help tech students and new professionals get practical with real-world devices, not just theory. We’ll walk through real checks, actual key presses, and what you should see at each stage. We’ll also touch on data safety, because a failed boot often hides a failing drive. Stay with me, because in a later section we’ll talk about one trick many repair shops use first that most home users never try.
What a “PC Won’t Boot” Problem Really Is and Why It Matters Now
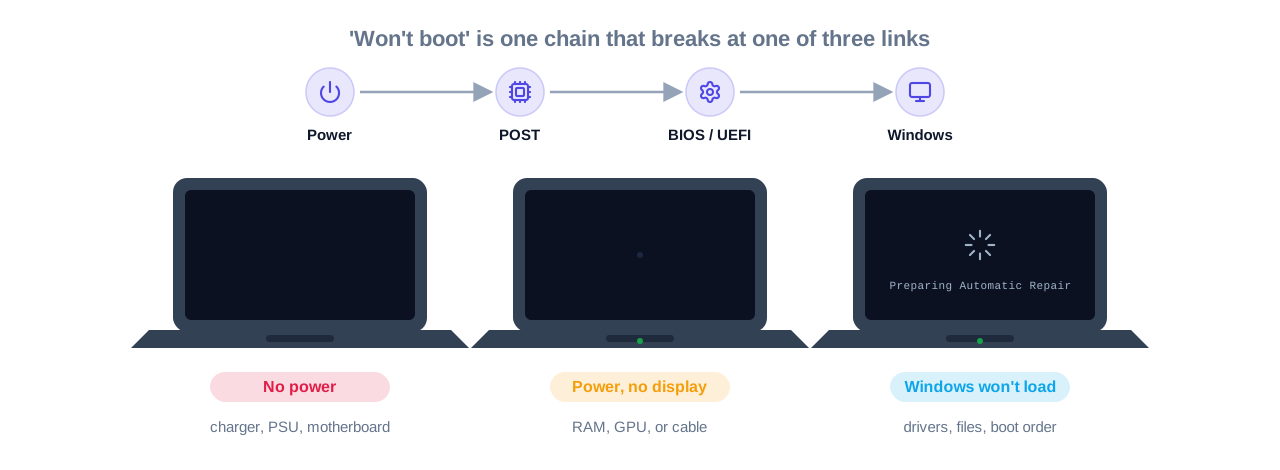
When we say your PC or laptop “won’t boot,” we don’t mean only “it’s totally dead.” We mean the normal startup chain breaks somewhere between pressing the power button and arriving at your desktop. That chain is simple in theory: power on, hardware check (POST), firmware (BIOS/UEFI) handoff, then Windows starts from your drive. When any link in that chain fails, you see symptoms like no power, no display, spinning fans with a black screen, or endless automatic repair loops.
This matters more now than a few years ago for two big reasons. First, modern systems use NVMe SSDs and UEFI, which are faster but more sensitive to firmware and boot-order quirks. A small BIOS change or bad update can suddenly make Windows “vanish” from the boot sequence. Second, more of your life is on that one machine: study projects, code, side gigs, and even crypto wallets. A black screen is not just annoying; it’s a direct threat to your productivity and your data.
If you’ve ever noticed how a laptop sometimes powers on but the screen stays black while the keyboard lights flash, that’s the system failing partway through POST or graphics initialization, not “random magic.” Knowing where it stops tells you where to look. In this guide, we’ll break boot failures into three practical categories: no power, power but no display, and Windows not loading. Later, we’ll return to the most overlooked step—using Safe Mode and Windows’ own recovery tools early, before you start pulling hardware.
Who This Is For and Who Should Skip It
This guide is for you if you’re a student or young professional who uses a Windows PC or laptop for coding, AI tools, gaming, or online classes, and suddenly it won’t start properly. You’re comfortable pressing keys in BIOS and trying software fixes, but you might not have ever opened a case or removed RAM. You care about fixing it yourself if possible, both to save money and to understand what actually went wrong.
It’s especially useful if you fall into one of these groups:
- Tech and AI students using a single laptop for everything. You probably installed a lot of tools, drivers, and maybe dual-booted once, so software conflicts and misconfigured bootloaders are common. This guide helps you untangle that without wiping your machine.
- PC gamers or hobby builders with a custom desktop. You may have upgraded RAM or a GPU recently and now get a black screen with fans spinning. We’ll walk through minimal-hardware tests and how to reset components safely.
- Remote learners or junior devs who rely on a company or campus laptop. You may not be allowed to open the hardware, but you can still use recovery environments, Safe Mode, and disk checks to get the system booting again or at least recover your files.
If you expect a one-click fix or you’re not willing to read prompts on-screen and follow them carefully, this guide will frustrate you. And if your machine is under on-site warranty and you’re not comfortable opening it, you should stop at software steps and call support before you touch the hardware. If you are a hands-on learner who wants a clear, safe process to follow when your PC refuses to boot, this article is written for you.
How Boot Troubleshooting Actually Works Complete Process
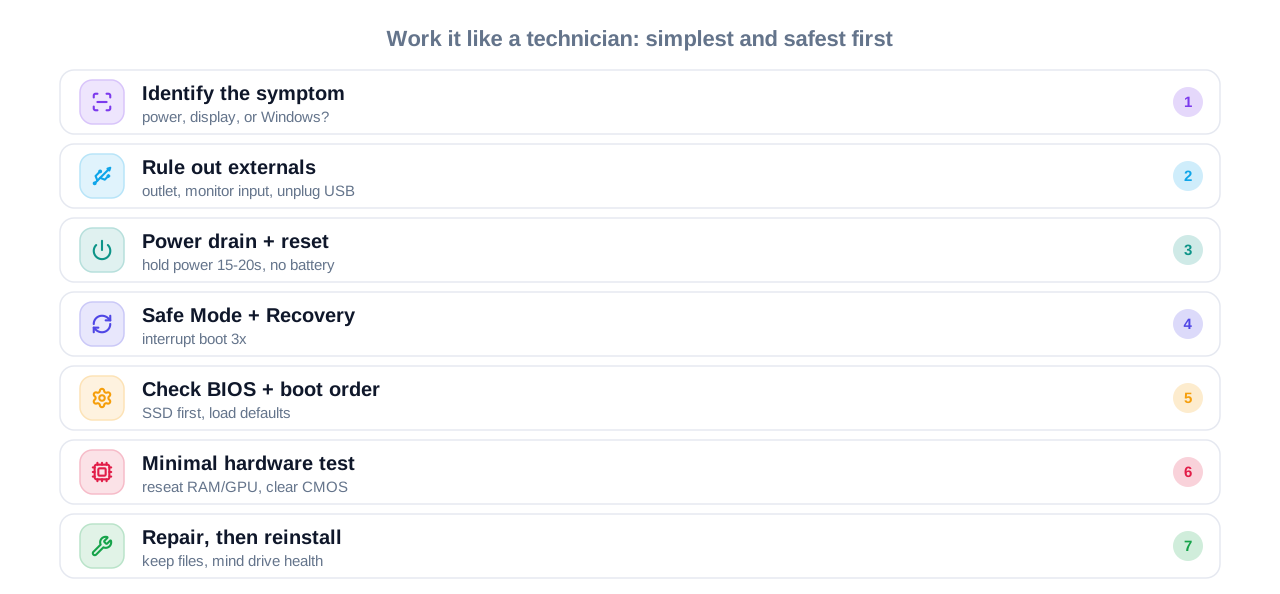
When your PC or laptop refuses to boot, the smartest way to work is like a technician: start with the simplest, least risky checks and move step by step towards deeper hardware or OS fixes. Each step either solves the problem or gives you a clear signal about what to try next. When you actually follow a structured path like this, you avoid random experiments that can make things worse or erase data.
Step 1: Identify the symptom category
First, watch what happens after you press the power button. Does nothing turn on at all (no fans, no lights)? That’s a no‑power issue and usually points to the charger, outlet, power supply, or a dead motherboard. Do you get fans and lights but absolutely no image on the screen, not even a logo? That’s “power but no display,” often tied to RAM, GPU, or display issues. If you see a logo, spinning dots, blue screen, endless automatic repair, or constant restarts, you’re in “Windows not loading” territory. Labeling it upfront keeps you from wasting time in the wrong area.
Step 2: Rule out external basics
Next, eliminate obvious external causes. Check the power outlet with another device, confirm the power strip is on, and test a different charger if available. For laptops, disconnect everything: USB drives, external HDDs, printers, docks, and SD cards. For desktops, also check the monitor: make sure it’s powered, set to the right input, and test with a different cable or screen if you can. It’s surprising how often a “dead PC” turns out to be a monitor on the wrong HDMI input.
Step 3: Perform a power drain and basic reset
If the device powers on but shows no display or keeps freezing early, do a power drain. Turn off the computer, unplug the power cable, and on laptops remove the battery if it’s removable. Hold the power button for 15-20 seconds to discharge residual power, then reconnect power and try starting again. On some systems this simple reset clears odd firmware states and brings the machine back to life; in practice this is one of those “magic” steps repair shops quietly try first because it has zero cost and a surprisingly high success rate.
Step 4: Try Safe Mode and Windows Recovery (if there is a logo)
If you see a Windows logo, spinning dots, or “Preparing Automatic Repair,” your hardware is at least starting; the problem is probably with Windows or drivers. Interrupting the boot sequence three times in a row (powering off during startup) usually forces the system into the Windows Recovery Environment, where you can choose Advanced Options, then Startup Repair or Safe Mode. In Safe Mode, uninstall recently added drivers or software, run a malware scan, and check disk health. When you actually do this, you’ll find that many “random” boot failures started right after a specific update or driver installation.
Step 5: Check BIOS/UEFI and boot order
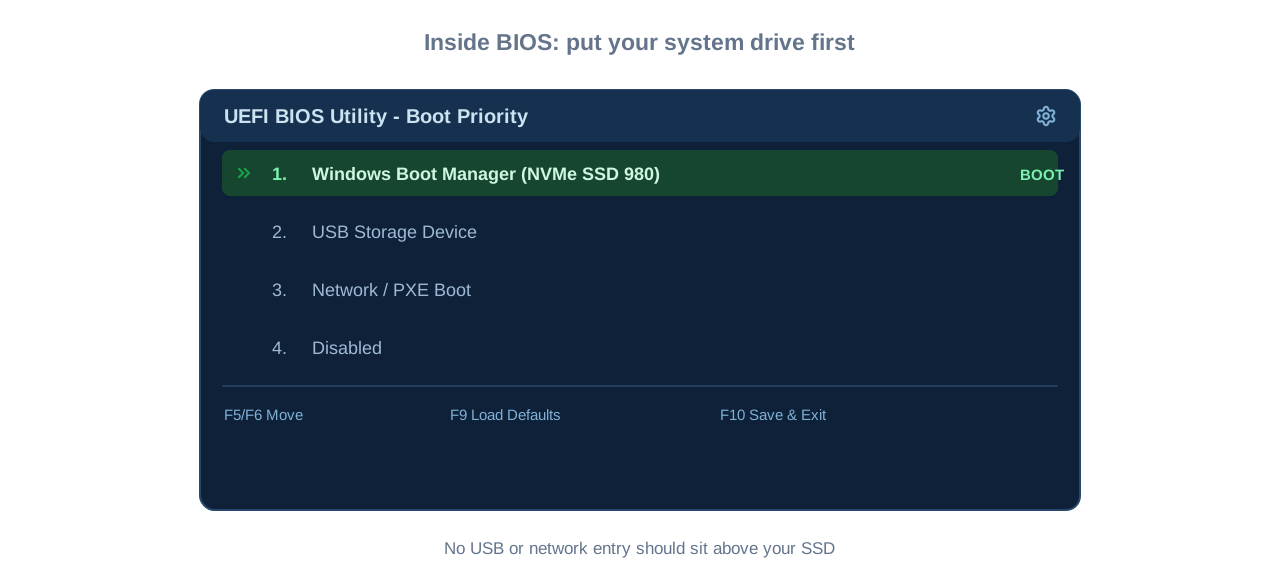
If Windows won’t load but you can reach your BIOS/UEFI (usually with Delete, F2, or a similar key at startup), look for the boot section. Confirm your primary system drive (often labeled with your SSD model) is listed first in the boot order and that no USB devices or network boot entries sit above it. You can also reset BIOS to default settings via a menu option, which often fixes misconfigurations. One thing most guides skip: if you have multiple drives, temporarily disable all but one and see if Windows boots; that trick quickly tells you which drive actually holds your OS.
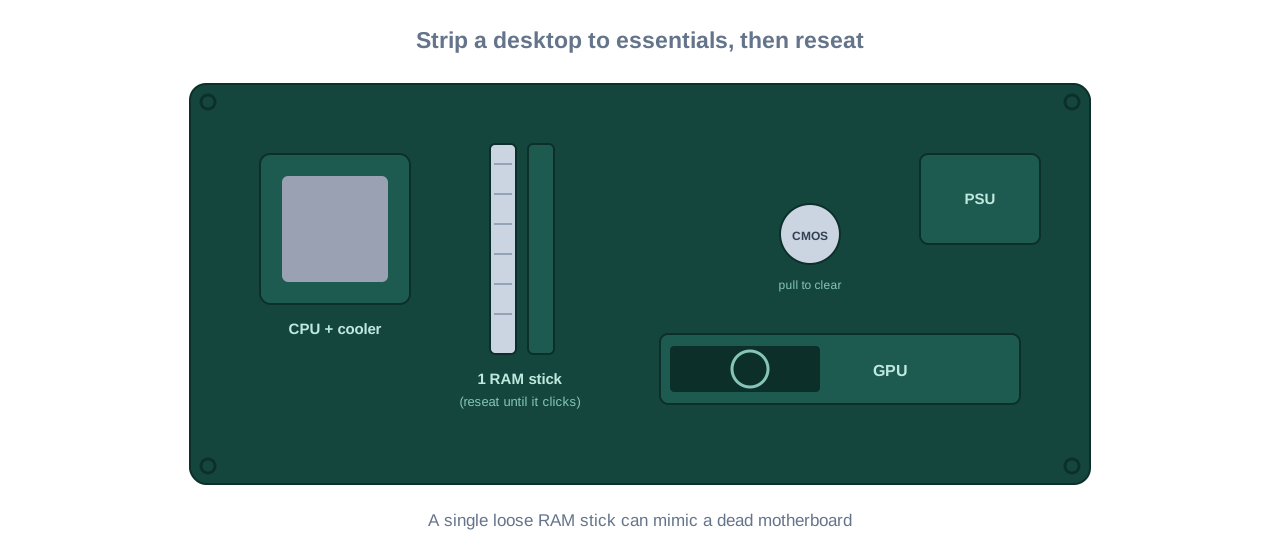
Step 6: Minimal hardware test (for desktops, and only if you’re comfortable)
For a desktop that powers on but doesn’t show anything or keeps restarting, strip the system down to essential components: motherboard, CPU with cooler, one stick of RAM, power supply, and (if no integrated graphics) the GPU. Reseat the RAM by removing it and pressing it back into the slot until both clips snap. Do the same with your GPU and power connectors. Clearing CMOS—by removing the coin-shaped battery for a few minutes, then reinstalling—resets firmware settings and often resolves boot loops after unstable overclocks or BIOS changes. This is where patience pays off; A single slightly loose RAM stick can mimic a dead motherboard.
Step 7: Windows repair or reinstall (with data safety in mind)
Once you’re confident the hardware is basically fine, your last resort is repairing or reinstalling Windows with a bootable USB. Use Startup Repair, System Restore, or a “Reset this PC” option that keeps your files when possible. If you suspect the drive is failing (clicking sounds, very slow access, or errors), stop here and look into backing up data from another machine or a professional data recovery service. The one thing many people get wrong is reinstalling Windows repeatedly on a dying drive, which just reduces the chance of saving anything later.
Comparison Table Boot Failure Scenarios Side by Side
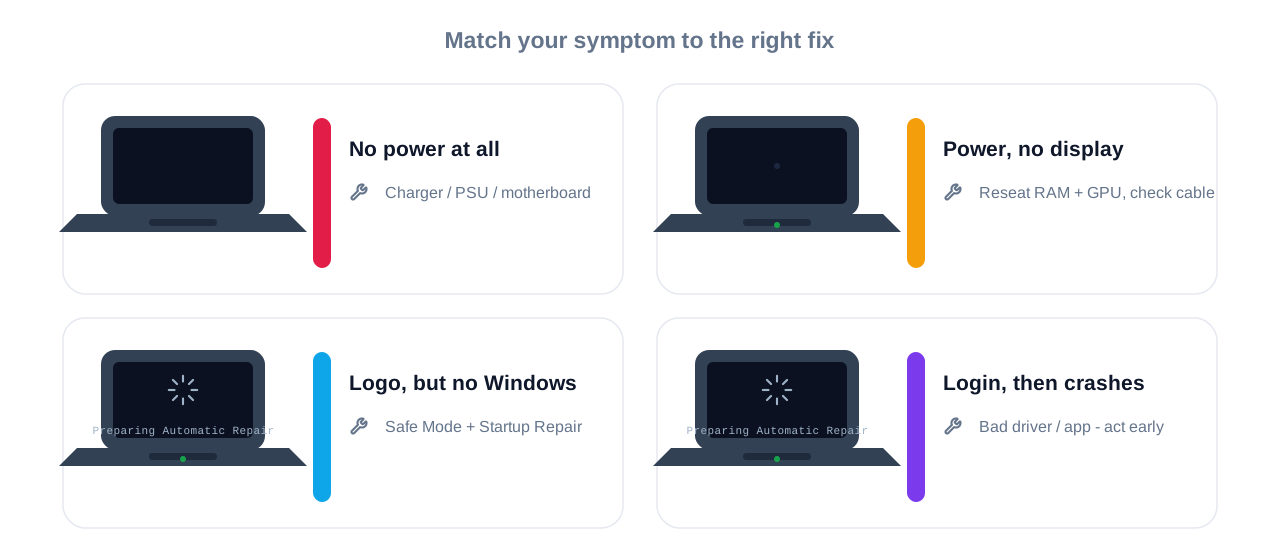
Below is a quick comparison of the three main “PC won’t boot” situations you’ll run into, plus a fourth: when Windows starts but crashes during login.
| Name/Option | Key Feature | Best For | Limitation | Verdict |
| No Power at All | No lights, no fans, no sounds. | Spotting dead PSU, charger, or motherboard | Requires swapping chargers/PSU to confirm | Start here if the machine looks totally dead |
| Power On, No Display | Fans and LEDs work, screen stays black | Diagnosing RAM/GPU/display issues | Needs case opening on desktops | Critical for gaming rigs and external GPU laptops |
| Boots to Logo but No Windows | Logo appears, then loops, errors, or auto repair | Fixing Windows, drivers, or boot configuration | Can be time-consuming to repair software | Use Safe Mode, Startup Repair, and boot-order checks first |
| Reaches Login Then Crashes/Freezes | Windows loads but crashes after login or under load | Tracking bad drivers, startup apps, or malware | Easy to ignore early signs of drive failure | Treat it as a warning and clean up before it becomes a no‑boot case |
For most students and new builders, “power on, no display” and “boots to logo but no Windows” are the most common and the most fixable at home. The completely dead system usually needs a new charger or PSU, while the login-then-crash scenario is your early warning to act before exams or project deadlines.
Real Benefits of Troubleshooting the Right Way With Specifics
When you handle a boot failure systematically, the first obvious benefit is money saved. A basic repair visit in North America often starts around 70–120 USD for diagnosis alone, and you’d be surprised how many tickets are solved with simple steps like reseating RAM or correcting boot order. When you do this yourself, you keep both your cash and your time especially if the issue hits the night before a submission.
Another benefit is control over your data. When you understand the difference between a software boot problem and a failing drive, you can decide whether to risk repeated restarts or stop and focus on backup. Some data recovery companies report that a single failing drive can jump from “recoverable” to “very hard” after a few hours of continuous retries. When you follow a careful process, you’ll find that you naturally limit unnecessary reboots and give yourself better odds of keeping your projects, research, and personal photos intact.
You also gain real technical confidence. Once you’ve successfully entered BIOS, changed boot order, used Safe Mode, and run Startup Repair, UEFI no longer looks like some secret engineer-only zone. The next time Windows breaks after a GPU driver update, you won’t panic; you’ll know exactly which screen to aim for and what to click. That confidence spills into other areas—tuning your system, trying a dual-boot, or even helping friends with their machines.
A benefit most articles skip is how this skill changes your relationship with your main work device. When you do this the first time, you’ll find that you start planning for failure: keeping a bootable USB drive handy, scheduling backups, and avoiding “I’ll just fix it later” when Windows starts behaving strangely. That mindset shift alone can save you from catastrophic data loss during finals or an important internship project.
Beginner Mistakes Most People Make nd the Fix
Mistake 1: Randomly pressing keys or changing BIOS settings
In the panic of a failed boot, many people hammer every function key, open BIOS by accident, and toggle random options hoping something will work. This happens because firmware menus feel like a black box, so anything inside seems equally likely to help. The result is often a disabled boot drive, wrong boot mode, or broken secure boot configuration, which makes the original problem even harder to trace. The fix is simple: before you change anything in BIOS, take a phone photo of each page, and only touch options related to boot order or “load defaults.”
Mistake 2: Ignoring external devices and the monitor
A classic beginner pattern is to assume the PC itself is dead while the screen is actually on the wrong input or an external USB drive is stealing boot priority. People skip this check because the failure feels too “big” to be something as small as an HDMI port. The consequence is wasted hours and sometimes a paid repair just for a technician to unplug a USB stick. The fix: always start by disconnecting all external storage and confirming your monitor input and cable before opening the case or reinstalling Windows.
Mistake 3: Reinstalling Windows immediately, without diagnosis
Many users jump straight to reinstalling Windows as soon as they see a boot loop or blue screen. It happens because reinstalling sounds like a cure-all and YouTube tutorials often jump there fast. The danger is that if your drive is failing, writing a fresh OS on top can push it over the edge and make data recovery costly or impossible. Better practice is to try Startup Repair, Safe Mode, and System Restore first, and only reinstall once you’ve checked the drive’s health or backed up critical files.
Mistake 4: Constantly hard-power cycling the machine
When a PC hangs on a logo or black screen, it’s tempting to keep holding the power button to force restarts over and over. People do this because it feels active—like they’re trying something—especially when there’s no error message. But repeated abrupt power cuts during disk activity can corrupt file systems and make a minor issue become a major one. Instead, use the three-interrupt method intentionally to reach Windows Recovery, then stop and work through the menu options calmly.
Mistake 5: Reseating or replacing parts without grounding or notes
New builders often pull out RAM, GPUs, or drives without touching metal to discharge static or noting which slot or cable went where. It usually happens out of excitement and fear, not malice. The fallout can be damaged components, bent pins, or a machine that now has multiple new problems. The fix is to always shut down, unplug, hold the power button to drain, and touch the case metal before touching parts—and take quick photos of everything before you move it.
Mistake 6: Assuming “no display” means the GPU is dead
One subtle mistake many people make right now is blaming the graphics card immediately when they get a black screen with power. Because GPUs are expensive, they stand out as the scariest part to blame. In reality, poorly seated RAM or a misconfigured BIOS can cause identical symptoms. The fix is to always reseat RAM and try the integrated graphics output (if available) before you conclude the GPU is gone.
Expert Tips That Actually Work
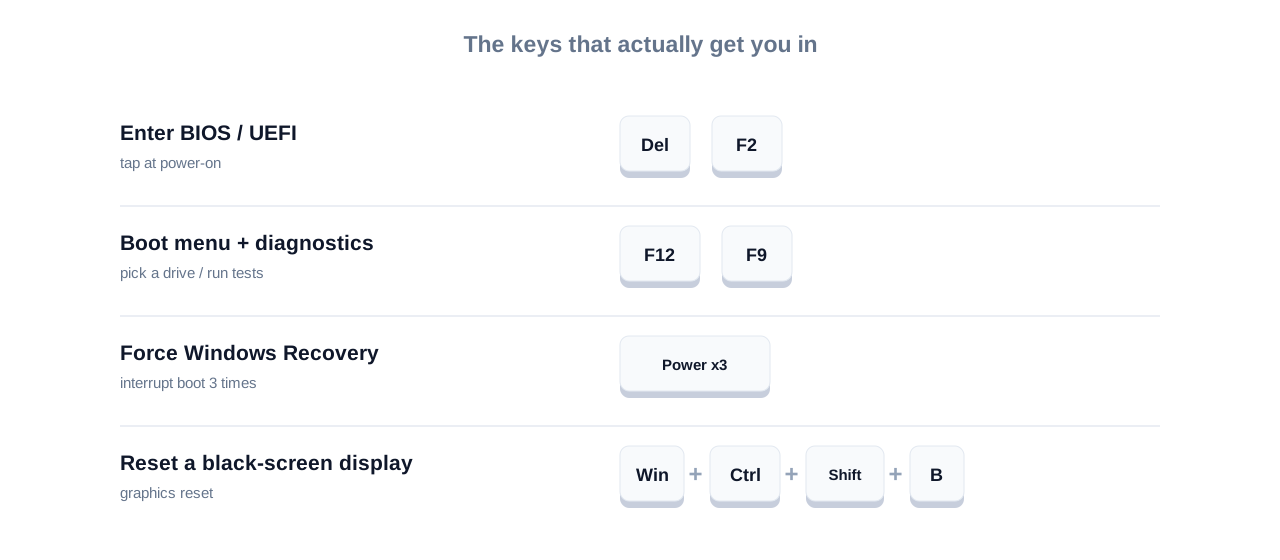
Tip 1: Use keyboard shortcuts to wake up a “fake dead” display
Sometimes your PC is running fine but stuck on a bad display handoff. Pressing Windows + Ctrl + Shift + B triggers a graphics reset on many systems and can bring back a black screen without a full reboot. This works because Windows reinitializes the display driver and signal; if you hear a beep, the shortcut was detected even if you can’t see it yet. It’s a quick test before you open anything or force a hard shutdown.

Tip 2: Listen to fans and drivers before touching anything
Before you even look at the screen, pay attention to the sounds when you power on. A completely silent machine suggests power or motherboard issues; fans spinning up then cutting off can indicate short protection or thermal problems; a repeating spin-up suggests a struggling PSU. Hard drives making clicking or grinding sounds are a strong sign to stop and protect data instead of doing repeated boots. Technicians rely on these tiny cues to decide where to focus first.
Tip 3: Use minimal hardware and a cardboard test for desktops
If you suspect short circuits or case-related issues, you can run a “breadboard” test by taking the motherboard out of the case and placing it on the motherboard box, connecting only the PSU, CPU, one RAM stick, and GPU (if needed). This removes the case and extra screws from the equation and often reveals if a misaligned standoff or stray screw was shorting the board. It’s a trick many repair shops use when a system fails immediately after a new build.
Tip 4: Change one thing at a time and write it down
Boot issues can create a lot of noise: BIOS resets, RAM shuffles, new cables, and USB drives all happening at once. When you change multiple variables together, you can accidentally fix the problem but don’t know which change mattered—so you can’t repeat or explain it next time. Keep a simple note on your phone: “10:05 – removed USB drive; 10:10 – moved RAM to slot 2,” and so on. In practice, you’ll find it makes your troubleshooting feel more like a controlled lab and less like chaos.
Tip 5: Use manufacturer diagnostics before assuming the worst
Many laptops and major-brand desktops have built-in diagnostics accessible with keys like F12 or a dedicated button at startup. These tools can test memory, drives, and even fans without loading Windows. Running them gives you error codes that support or online forums can interpret, turning vague problems into specific suspects. It’s faster and safer than randomly swapping parts if you’re not sure.
Tip 6: Keep a dedicated bootable USB with tools you trust
Prepare one USB drive with a Windows installation image and another with a rescue environment or Linux live system when your PC is healthy. That way, when a boot failure happens, you can test if the hardware can boot anything and copy data out even if Windows is broken. Most people only think about this after they’ve already lost access, but once you’ve been through one bad incident, you’ll see why pros always have such tools ready.
Tip 7: Use Safe Mode to uninstall GPU drivers and big updates
If your system boots into Safe Mode but crashes in normal mode, focus on graphics drivers and major Windows updates first. Uninstall the GPU driver from Device Manager and restart; Windows will fall back to a basic driver, which is often enough to regain a stable desktop. Then you can install a fresh driver downloaded directly from the GPU vendor.
Tip 8: Treat early boot errors as free training, not just failures
Whenever you hit a problem that still lets you reach BIOS, Safe Mode, or diagnostics, see it as a chance to practice without the full pressure of a total failure. Explore BIOS menus, note temperatures, and understand which drive is which. The more you do this when things are only slightly broken, the calmer you’ll be when a real disaster hits.
Advanced Insights What Nobody Else Tells You
Insight 1: Boot order issues are often triggered by “successful” actions
Students often break boot order right after doing something that felt right: adding a new SSD, plugging in an external bootable USB, or enabling a virtualization feature. UEFI firmware can silently change the boot priority when a new bootable device appears, pushing your main OS down the list. From your perspective, “nothing changed,” but under the hood, the firmware made a choice you didn’t see. That’s why a quick look at the boot priority menu should be part of your early checks whenever you’ve recently added storage.
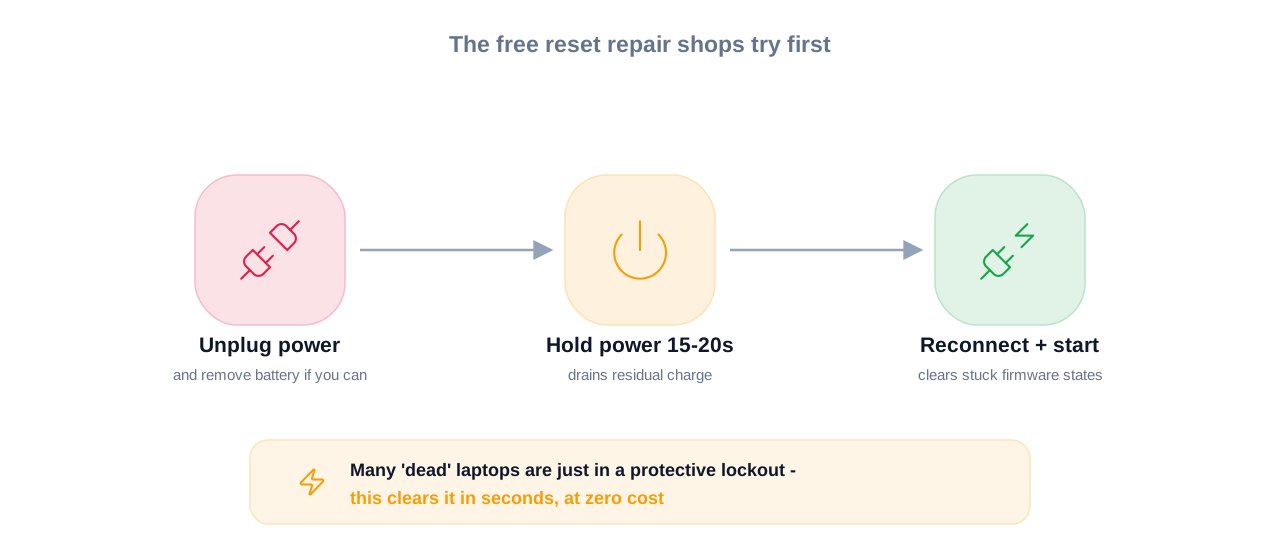
Insight 2: Many “dead” laptops are actually in a protective state
Modern laptops from big brands sometimes refuse to boot after repeated failed starts, sudden power loss, or overheating. They aren’t dead; they’re locked in a low-level protection mode that looks like a dead system but can be cleared by a proper power drain and a long press of the power button. This is rarely explained in manuals, but technicians see it constantly and fix it in minutes. That’s why that 20‑second power button hold is worth trying early.
Insight 3: Boot problems are often the first visible symptom of bigger health issues
A system that starts failing to boot occasionally—once a week, then daily—is giving you a warning about deeper issues like failing storage, unstable RAM, or a weak PSU. Many users treat each incident as a one-off glitch and only act when it stops booting entirely. In practice, the first persistent boot problem is your best chance to save data and replace parts on your schedule, instead of in a crisis the night before an exam.
Insight 4: Data recovery and boot recovery are not the same goal
When you’re stressed, it’s easy to merge “I want my PC back” with “I want my data back.” They’re related, but not identical. For example, a drive that can’t reliably boot Windows may still allow you to copy data slowly from a rescue environment, but every full Windows boot attempt might push it closer to total failure. If your data matters more than having the same Windows installation, prioritize stable access from another system or environment, then worry about a clean OS later.
Frequently Asked Questions
First, test the power source with another device and confirm any power strip or surge protector is on. On a desktop, check that the PSU switch at the back is set to “on” and that the power cable is fully seated in both the PC and the wall. On a laptop, try a different outlet and charger if you can, and look for any charging LED response. If there’s still no sign of life, remove the battery if it’s removable, hold the power button for 15–20 seconds to discharge residual power, then reconnect and try again. If you still get nothing—no lights, no fans—you’re likely dealing with a failed charger, power supply, or motherboard and should consider professional diagnosis.
Start by checking your monitor: verify it is powered, set to the correct input, and test another cable or display if possible. If you’re on a desktop with a dedicated GPU, try plugging the monitor into the motherboard’s video port to see if integrated graphics work. You can also press Windows + Ctrl + Shift + B to reset the graphics driver and attempt to wake the display. If that doesn’t help, shut down, unplug the PC, and reseat the RAM and GPU, making sure each clicks firmly into place. Persistent black screen issues after that may point to bad RAM, GPU, or motherboard, so built-in diagnostics or a shop visit is your next step.
A looping restart usually means Windows is hitting a serious error during startup—often a bad driver, corrupted system file, or failing hardware. Force the system into Windows Recovery by interrupting boot three times, then choose Advanced Options and run Startup Repair or boot into Safe Mode. In Safe Mode, uninstall any recent drivers or software, and run a malware scan. If Startup Repair and System Restore both fail, and you suspect hardware (like a new RAM stick or SSD), temporarily remove or reseat that part and try again.
If Windows fails to boot several times in a row, it should automatically launch the Windows Recovery Environment. From there, choose Troubleshoot, then Advanced Options, then Startup Settings, and finally Enable Safe Mode. On some systems you can also boot from a Windows installation USB and select “Repair your computer” instead of Install. Older machines sometimes still respond to pressing F8 repeatedly right after powering on, but this is less common now. Once in Safe Mode, you’ll have a basic desktop where you can remove problem drivers and updates or back up important files.
If your PC reaches BIOS/UEFI, open the storage or boot section and see whether your drive is detected and listed with the correct size. If it’s missing entirely, check power and data cables on desktops or reseat the drive in its slot on laptops. If the drive appears but Windows won’t load, use Safe Mode or a bootable USB to run disk checks and look for errors or unusual noises during access. Clicking sounds or frequent read errors are strong signs of physical failure, which means you should focus on data recovery instead of repeated boot attempts.
In many cases, yes. Startup Repair, System Restore, and “Reset this PC” with the option to keep your files are all designed to fix system issues while preserving personal data. As long as the drive itself is healthy, these tools can repair corrupted boot files or undo a bad update. If you’re unsure about drive health, booting from a USB and copying data to an external drive before heavy repairs is safer. Remember that any operation that formats the drive or performs a full clean install will erase files, so read every prompt carefully.
You should stop if the machine shows signs of physical damage, liquid exposure, strong burning smell, or odd electrical behavior like sparks. It’s also wise to seek help when you’ve tried basic steps—power checks, Safe Mode, Startup Repair, and simple reseating—without progress and the system is still under warranty. If the drive makes loud clicking sounds but still sometimes boots, stop everything and consult a data recovery specialist before it fails completely. Finally, if you’re uncomfortable opening the case or handling parts, it’s better to pay for a clean hardware diagnosis than risk damaging components.
When your machine is healthy, create a Windows recovery drive and a separate backup of your important files. Enable automatic backups to an external drive or cloud service so a sudden failure doesn’t threaten your work. It also helps to keep basic notes of your hardware (drive models, RAM size, GPU model) so you can recognize them in BIOS. The next time you face a boot issue, you’ll have both the tools and information ready, making the whole situation far less stressful.
Quick Summary Take This Away
When your PC or laptop refuses to boot, the fastest way to get it back is to treat the problem as a broken chain and figure out which link failed: power, display, or Windows itself. Start with the basics—outlet, charger, monitor input, and a proper power drain—because a surprising number of dramatic-looking failures are fixed in those first minutes. Once you know power and display are fine, use Windows Recovery, Safe Mode, and Startup Repair before you think about reinstalling anything.
If you’re on a desktop, minimal hardware testing with one RAM stick, the CPU, and (if needed) the GPU can reveal loose parts or bad modules that look exactly like “dead” systems. Along the way, watch for clues about drive health: strange noises, very slow loading, or frequent errors are your cue to protect data first, fix Windows second. The whole point of this guide is to give you a safe path that solves real problems without turning a fixable situation into data loss.
Right now, your next move is simple: match your symptom to the category we covered, follow the steps in order, and resist the urge to try everything at once your future self (and your project deadlines) will thank you.
Conclusion
The three most important ideas from this guide are straightforward. First, “PC won’t boot” is not one problem but several, and identifying your exact symptom is half the fix. Second, a calm, ordered process—power checks, external device checks, recovery tools, then hardware—solves more issues than random experiments and protects your data in the process. Third, early warning signs like occasional boot loops or black screens are chances to act, not glitches to ignore.
For a student or young tech professional, learning this is not just about saving one laptop. It’s a practical skill you’ll use on your own rigs, family machines, and even future clients. You now know the same sequence many technicians follow when a system hits their bench. Take a breath, pick the step that matches what you’re seeing on your screen (or not seeing), and start there. You’re far more capable of fixing this than you probably feel right now.